Striped Bobble Pillow - Free Crochet Pattern
- Grace
- Aug 19, 2019
- 3 min read
Add a cozy modern touch to your home with the Striped Bobble Pillow. Fun and easy to stitch up, this pillow is the ideal weekend project.

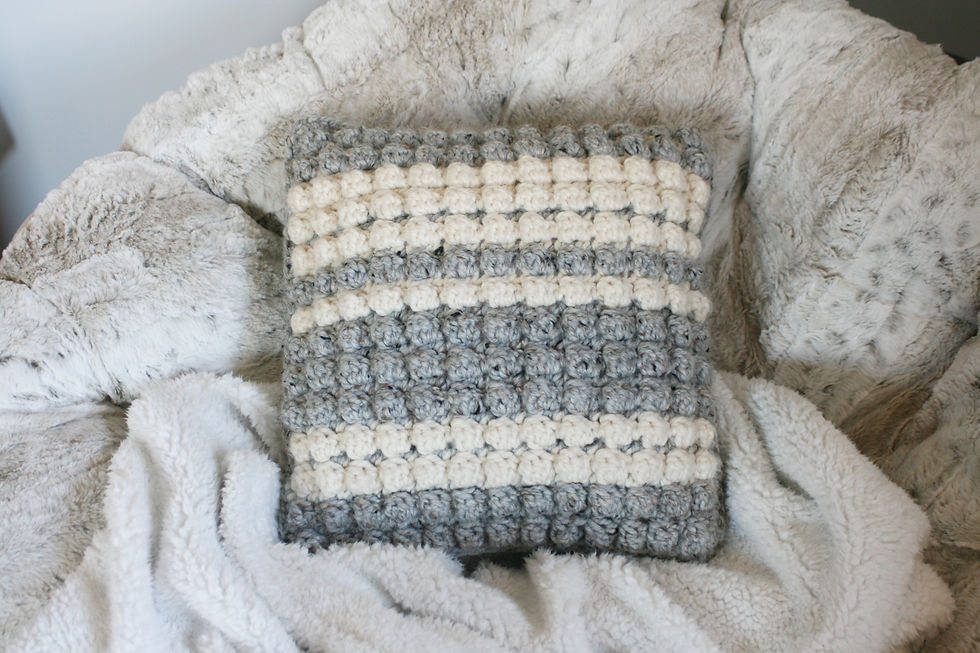
Bobbles are one of my favorite stitches. They are super squishy and satisfying, and don't even get me started on how incredibly fun they are to stitch! So it was only natural for me to make a pillow that had a lot of bobbles.

In total Grace fashion, I chose gray and white for my stripes. I firmly believe that the color of the project is just as important as the texture or the design. The color can totally shift the mood of the project. I think these colors together create such a modern, sophisticated look.

There are so many possibilities with this pillow. In the pattern I wrote out my stripe pattern, but feel free to create your own! You can make each row of bobbles a different color or make the whole pillow one color. Don't be afraid to add a lot of color changes. All the ends will get tucked in at the end, so there are no ends to weave in!
The free pattern is down below, but click here for a PDF version.
Striped Bobble Pillow
MATERIALS
330 yards of super bulky (6) yarn.
• I used Lion Brand’s Wool-ease Thick ‘N Quick. I used 2 skeins of Gray Marble (color A) and 2 skeins of Fisherman (color B)
N/9.00mm
Tapestry needle
16 inch pillow form or polyester stuffing
Skill Level: Easy
Measurements: Each square measures 14 x 14 inches.
Notes:
1) This pattern is written in American Crochet Terms.
2) The ch 1 at the beginning of each row does not count as a st
Stitches used:
St: Stitch
Sl st: Slip stitch
Ch: Chain
Sc: Single crochet
Bob st: Bobble stitch
Bobble Stitch: Yarn over, insert hook into st, yarn over, pull through st (3 loops on hook), yarn over, pull through 1st 2 loops (2 loops on hook) . Yarn over, insert hook into same stitch, yarn over, pull through st (4 loops on hook), yarn over, pull through two loops, (3 loops on hook) . Yarn over, insert hook in same st, yarn over, pull through st, (5 loops on hook), yarn over, pull through 1st 2 loops (4 loops on hook) . Yarn over, pull through all 4 loops . Seal the bobble stitch with a sc in the next st . NOTE the bobble will show on the opposite side.
Gauge: 6 rows of sc= 3 inches
PATTERN:
Ch 30
Row 1: 1 sc in 2nd ch from hook and in each ch across. (29) Ch 1, turn.
Row 2: *1 sc in 1st st, 1 bob st in next st* repeat across, ending with 1 sc in last st. (29) Ch 1, turn.
Row 3: 1 sc in each st across. (29) Ch 1, turn.
Repeat rows 2-3 for a total of 29 rows. After the 2nd square is completed do not cut yarn.


Square 1 color changes:
Row 1-4: Color A
Row 5-6: Color B
Row 7: Color A
Row 8: Color B
Row 9-15: Color A
Row 16-17: Color B
Row 18: Color A
Row 19-20: Color B
Row 21: Color A
Row 22-25: Color B
Row 26: Color A
Row 27: Color B
Row 28-29: Color A


Square 2 color changes:
Row 1-2: Color B
Row 3: Color A
Row 4-6: Color B
Row 7-9: Color A
Row 10: Color B
Row 11-14: Color A
Row 15-17: Color B
Row 18-20: Color A
Row 21: Color B
Row 22: Color A
Row 23-26: Color B
Row 27-29: Color A
Finishing:
Line the squares with one on top of the other and with the bobble sides facing out. While working through both squares, evenly sc around the edge. Work 2 sc in the each corner. Once before finishing the 4th side, slide the pillow in, and continue to sc through both squares. Sl st into 1st sc. Fasten off and weave in loose ends.

I hope you enjoy this pattern! If you make your own pillow feel free to tag me @_stitchberry on Instagram, I would love to see your own pillow!

Comments