Chunky Rustic Pumpkin - Free crochet pattern
- Grace
- Aug 23, 2019
- 2 min read
Make some chunky rustic pumpkins to add to your farmhouse style home decor for fall.

Fall is my favorite season. I mean what's not to like? Cool weather, cozy sweaters, and PUMPKINS. To celebrate my obsession with fall I will be releasing three (!!!) pumpkin patterns for free here on the blog!

I thought I would kick off with this classic, rustic pumpkin. I love how now-a-days decorative pumpkins come in all colors and not just the traditional orange. Since the yarn is more of a "busier" colorway, I wanted to keep the design classic and simple. If you know how to work single crochets and single crochet decreases you can totally make this!

I hope you enjoy the free pattern below!
Chunky Rustic Pumpkin Crochet Pattern
PDF Pattern: Click HERE
Materials
80 yards of super bulky (6) yarn
• I used 1 skein of Lion Brand’s Wool-Ease Thick ‘N Quick in Oatmeal.
K/7.00mm crochet hook
Tapestry needle
2 inch stick
String/twine
Scraps of leather
Stitch marker
Hot glue gun
Stuffing
Size:
The size will vary depending on how much the pumpkin is stuffed. But the approximate size is 2 ¾ inches tall and 6 ¼ inches in diameter.
Notes:
1) This pattern is written in American Crochet Terms.
2) The ch 1 at the beginning of each round does not count as a st
Stitches used:
St: Stitch
Sl st: Slip stitch
Ch: Chain
Sc: Single crochet
Sc dec: Single crochet decrease
Sc dec: Insert hook into st, yarn over, pull back through st (2 loops on hook). Insert hook into next st, yarn over, pull back through st (4 loops on hook). Pull through all 4 loops.
Skill Level:
Easy
Gauge:
Unimportant
Pattern:
Ch 2
Round 1: In 1st ch, work 8 sc (8). Sl st in 1st st, ch 1.
Round 2: 2 sc in every st (16). Sl st in 1st st, ch 1.
Round 3: *1 sc in st, 2 sc in next st* repeat around (24). Sl st in 1st st, ch 1.
Round 4: *1 sc in 2 st, 2 sc in next st* repeat around (32). Sl st in 1st st, ch 1.
Round 5: *1 sc in 3 st, 2 sc in next st* repeat around (40). Sl st in 1st st, ch 1.
The rest of the pattern is worked in a continuous spiral, so a stitch marker is recommended.
Round 6-12: 1 sc in every st (40)
Round 13: *1 sc in 3 st, 1 sc dec in next st* repeat around (32)
Round 14: *1 sc in 2 st, 1 sc dec in next st* repeat around (24)
Round 15: *1 sc in st, 1 scdec in next st* repeat around (16)
Round 16: Work 8 sc dec around (8)
Fasten off leaving a long tail.
Assembly:
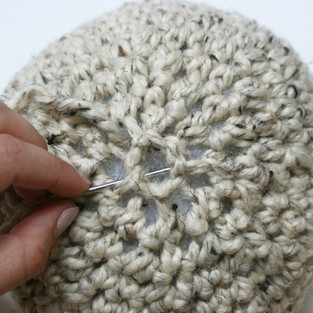
Stuff the pumpkin and cinch closed. To make the indentions, wrap the yarn around to the other side and insert to hook through the middle on the other side and pull the needle up through. Pull slightly to make a more defined indention. Repeat for total of 6 and space them out around the pumpkin.


Dab a little glue in the middle and insert the twig. Cut out some leaves out of leather and glue them next to the stick. To finish it off, tie some twine or string around the “stem”.

I hope you enjoyed making this quick, rustic pumpkin. Tag me on Instagram at @_stitchberry, I would love to see your pumpkins!

Comments